

Workload Mapping
Workload Mapping turns unmapped, discovered servers into logical application workloads, the foundation for every downstream insight, treatment recommendation and wave plan. The quality of your mapping directly drives the accuracy of everything that follows.
You don't need 100% coverage to get value, but the more servers you map, the sharper every downstream output becomes.
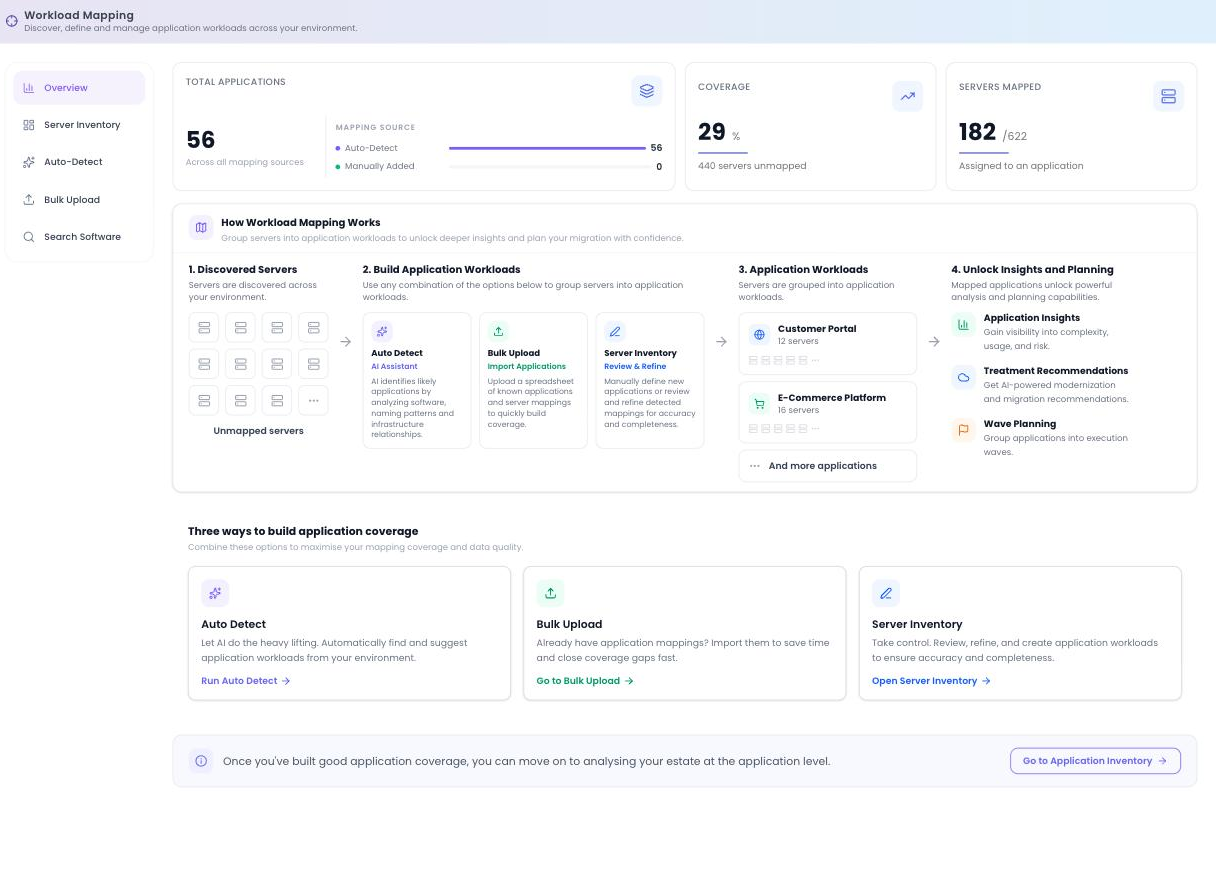
The Overview screen
Workload Mapping has a left sub-nav: Overview, Server Inventory, Auto-Detect, Bulk Upload and Search Software. The Overview is where you land; it shows your progress and points you at the right tool for the job. Three tiles keep your status in view:
| Tile | What it shows |
|---|---|
| Total Applications | How many application workloads exist, split by mapping source: Auto-Detect vs Manually Added. |
| Coverage % | The share of servers mapped, with the count still unmapped. |
| Servers Mapped | Servers assigned to an application as a proportion of the total discovered. |
How Workload Mapping works
The Overview includes a four-step diagram that explains the flow from raw infrastructure to planning:
1 · Discovered Servers
Everything your data sources found: the raw inventory waiting to be mapped.
2 · Build Application Workloads
Group servers into applications using Auto-Detect, Bulk Upload or Server Inventory.
3 · Application Workloads
Each application, with its servers grouped together as a workload.
4 · Unlock Insights & Planning
Application-level insights, treatments, cost modelling and wave planning all become available.
Three ways to build application coverage
There are three ways to build coverage, each with its own sub-page. Most teams combine all three.
Let the AI Assistant discover workloads from software and patterns.
Import existing mappings from a pre-filled CMDB template.
Take manual control of application-to-server mappings.
A fourth sub-page, Search Software, complements these by letting you map from the software up: find a known package across the estate and map the servers running it.
Recommended workflow
You don't have to pick one method; the fastest path to good coverage combines them in order:
Start with Bulk Upload
If you have CMDB data, Bulk Upload it first. Even a partial import gives the AI real-world examples to learn from, which sharpens the next step.
Run Auto-Detect
Run Auto-Detect to close the gap automatically, grouping the rest of the estate from software signatures and infrastructure patterns.
Review and confirm
Use Server Inventory and Search Software to review suggestions, resolve any unmapped servers, and validate specific products.
The AI is a starting point, not the final word. All analysis happens inside your Dr Migrate instance, and suggestions are always yours to review and adjust. Anything left unmapped is grouped under a single "Unmapped" application so nothing is ever lost.
When coverage is good
Once your coverage is healthy, move on via Go to Application Inventory, which opens Estate Explorer → Applications. There you view each application and its servers, inspect composition and coverage, and maintain application-level details (ownership, environments, sizing, hosting requirements, tags and notes) that sharpen planning later.
Why it unlocks the rest of the journey
Good application coverage is what turns Dr Migrate from an inventory tool into a planning tool:
Complexity, usage and risk at the application level.
AI-powered modernization and migration guidance.
Group applications into execution waves.
Next step
Once you've built good coverage, move on to Application Inventory in Estate Explorer, or head straight to Plan → Migration Planning.